Over the years, Fuzzy Math has used a couple of different tools to produce UX design deliverables for our clients. In fact, when the company first started, OmniGraffle was our go-to design tool. While OmniGraffle was really powerful, it lacked the ability to support visual design creation and was slowly becoming outdated, which pushed us to hunt for something new.
We did a lot of research into new design tools and came to realize that we were behind the curve when it came to switching to the latest and greatest design software. We wanted to step up our game and get our team connected with the most popular and consistently stable tool around, which naturally led us to use Sketch. Today, we’re still big fans of Sketch, and we’ve even become acquainted with plugins and workarounds that help us work even better within the platform.
Whether you’ve never used Sketch before or you’re interested in learning more about how our Fuzzy Mathers use this popular UX design tool, here’s an overview of how we’ve implemented Sketch into our UX design process and improved our workflow.
Why use Sketch over other tools?
Before we get into the weeds about how we use Sketch throughout a UX design project, here’s a few reasons why we love using Sketch over other design tools.
Streamlining UX to visual handoff
Previously, when our team was ready to move from the UX ideation stage of the process over to visuals, it took a lot of steps to get there. First, the UX team would develop wireframes in OmniGraffle, export those designs into a PDF, then the visual designer would work in Photoshop and those files would then be exported for client review. Now, the process is a lot more streamlined and a lot less cumbersome.
With Sketch, UXers can develop all of their assets (such as wireframes) right into the tool and handoff all of their designs to the visual designer all within the same program. Sketch not only has the capability to build out wireframes but also allows visual designers to develop high-fidelity compositions and components, such as buttons and icons, to use throughout a product’s design. This helps ensure consistency and organization throughout the product’s design process without the need for multiple files or teams working in different programs.
Speeding up design workflow
As mentioned, Sketch allows us to share designs among other designers at Fuzzy Math all within the same program which naturally speeds up our workflow. We are able to use a common design language with wireframe shared libraries that keep everything consistent, which is much harder to do when working between different programs.
In the same vein, Sketch also gives us the ability to develop symbols and libraries. Sketch symbols allow us to build robust style guides, pattern libraries, and design systems that are not only a useful deliverable for our clients but also give us as designers what is essentially a rulebook for how the product should look and work together. We use Sketch to build global wireframe libraries to create consistent and cohesive looking designs which is incredibly helpful when working on projects with multiple UX designers.
Intuitive interface for new designers
Several members of the Fuzzy Math team came to the organization without ever using Sketch beforehand. However, several team members have expressed how easily they picked up the tool compared to other design tools such as Photoshop or Omnigraffle. Sketch has a relatively easy to use and streamlined interface as well as a large support community on the web.
Plugins!
Still, there are some things that Sketch doesn’t inherently do well right out of the box. Luckily, designers, developers, and other Sketch users have built a solid library of Sketch plugins! These plugins add functionality, automate work, and help streamline shifting work between Sketch and other design and delivery tools. Here are some of our favorites:
- Spell Check Whole Page
This one is pretty straightforward — it does exactly what it says on the label! The one downside? Not recognizing lorem ipsum as placeholder text. But if you’re looking for a quick spell check before delivery, this plugin gets the job done beautifully. - Cluse or Stark
Cluse is nice for checking and tweaking your colors to ensure they pass accessibility contrast standards as defined by WCAG 2.1(without having to go outside of Sketch to something like aremycoloursaccessible.com anymore!)
Stark has much of the same functionality, but also allows designers to view their designs through the lens of various color blindness simulations.
Related: Designer’s Toolbox: Create Visually Accessible Experiences Using Stark - Find and Replace Text
Change a page name or a section title and need to make a quick update? Find and Replace Text can help with that. It even searches through symbol overrides! - Merge Duplicates
Clean up your symbols, layer styles, and text styles by merging duplicate. - Split/Combine Text
A handy plugin to split lines of text into different layers, or combine multiple text layers into one. Plus, a few bonus plugins including a quick toggle to show/hide layers. - Rename It
We’re all about organization, here. This plugin lets you batch rename layers and artboards to keep your files as clean as possible! - Select Similar Layers
Missing Adobe Illustrator’s “Select Similar Objects” feature? The Select Similar Layers plugin mimics that functionality in Sketch. - Batch Create Symbols
This simple plugin (one of our favorites) lets designers create multiple symbols at once. - Craft by InVision
Even if you don’t use InVision for prototyping or delivery, the Craft plugin is still one of the most robust and powerful plugins for extending your use of Sketch. It allows designers to seamlessly upload screens to InVision, quickly prototype within Sketch, and pulls in InVision’s Design System Manager data, if that’s something that you use. But more than that, it has options to quickly insert data and photos from your own library or one on the web. It’s customizable and flexible enough to fit your workflow, no matter what that is! If you only download one Sketch plugin, this one is our recommendation! - Zeplin
If you deliver designs through Zeplin, the Zeplin sketch plugin is crucial for uploading artboards and managing assets.
The Fuzzy Math Process with Sketch
Sketch is used throughout every phase of Fuzzy Math’s UX design process. Here’s a breakdown of which deliverables we create with Sketch throughout each phase and an example of what those finalized deliverables look like.
Discovery Phase:
A number of deliverables are developed during the discovery phase of a UX design project. However, since this phase is more about gaining an understanding of the product, the users, and the market, many of them do not require any visuals beyond a spreadsheet or keynote presentation.
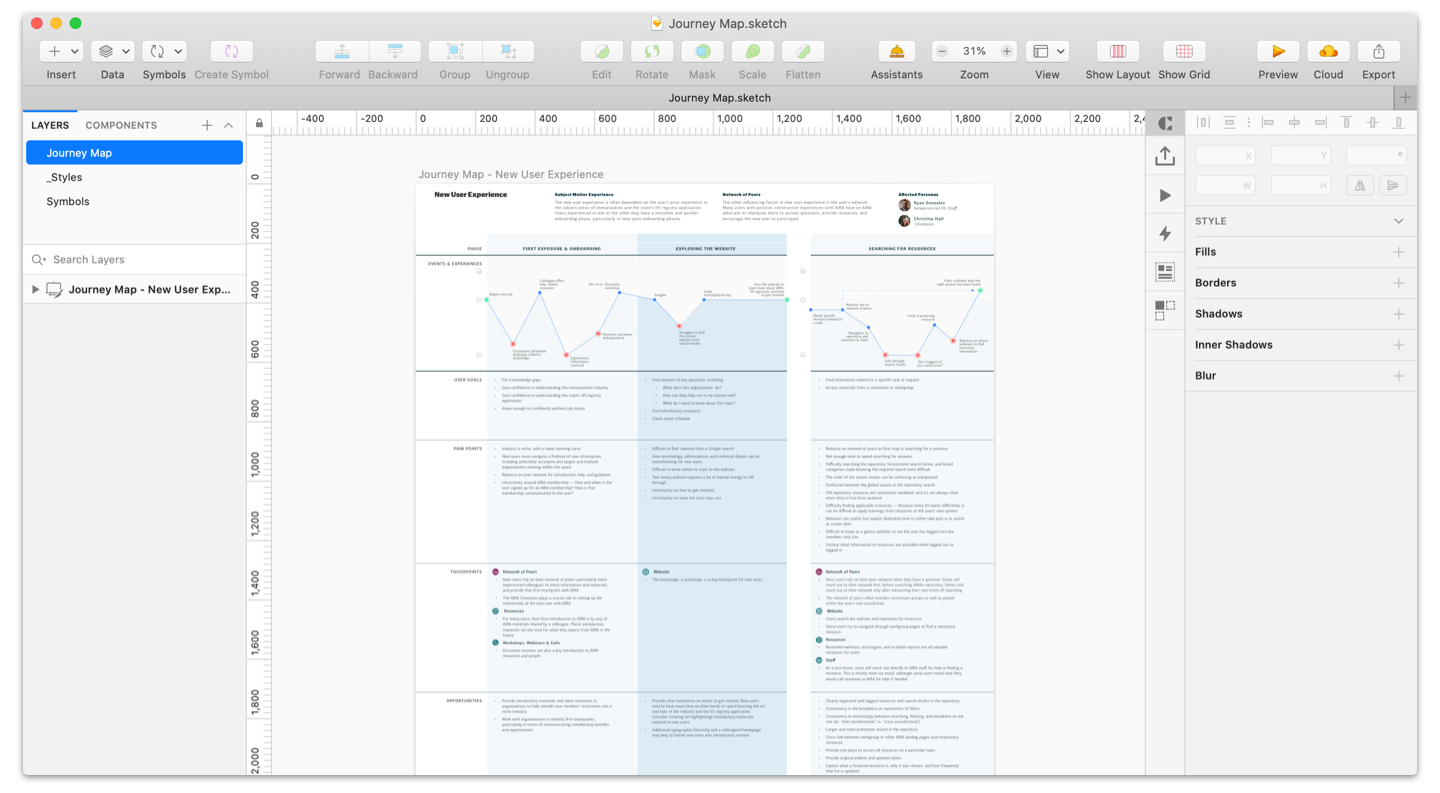
Journey Maps
Journey maps provide an understanding of the full life-cycle of your users’ experience, mapping both their non-digital touchpoints with one another and digital touchpoints with an application. With a current stare journey map, we identify the gaps between user expectations and the actual experience, thus uncovering a series of pain points we can solve moving forward. The end goal is to document how the product currently fits into the lives of its users and pinpoint areas for strategic advancement.
Later in the project, a future state journey map is developed in effectively the same way, however, in this case it’s anticipating how behavior will change once the new/updated product is introduced. In general, many pain points that were identified in the current state should disappear here, but there may be some that persist due to product or project scope (i.e. things whose solution was cut from scope, or which cannot be realistically solved by the product).
How it’s developed:
Current state:
The UX designer should already have identified the users and done enough research to understand those users’ current workflows. To create the journey map, a UX designer will start with a goal — the endpoint of the journey — and then plot out how the user(s) would go about achieving that goal by creating a visual in Sketch. Typically, goals and pain points at each step (in some cases, this may be at each phase) are tracked at a minimum in addition to actions. Beyond that data, think about other details that would be helpful in understanding how users’ context or mindset changes throughout the journey, layering that information into your map.
Future state:
If a designer has already created a process flow, they will use that as the basis for the journey map; if not, they will identify the steps or phases they expect to factor into the future state product. They will layer in any pain points or opportunities that will still exist once the new or updated product is launched, as well as any other data that helps show how users will interact with the product.
Design Phase:
At this point in the project’s lifetime, we’ve collected lots of data on our users and have a solid understanding of the product, its competitors, and where it fits within the context of the world. As expected, Sketch usage kicks into high gear during the design phase of the project and is used for most of the deliverables as pieces are passed between UX and visual designers and fine-tuned for the final phase.
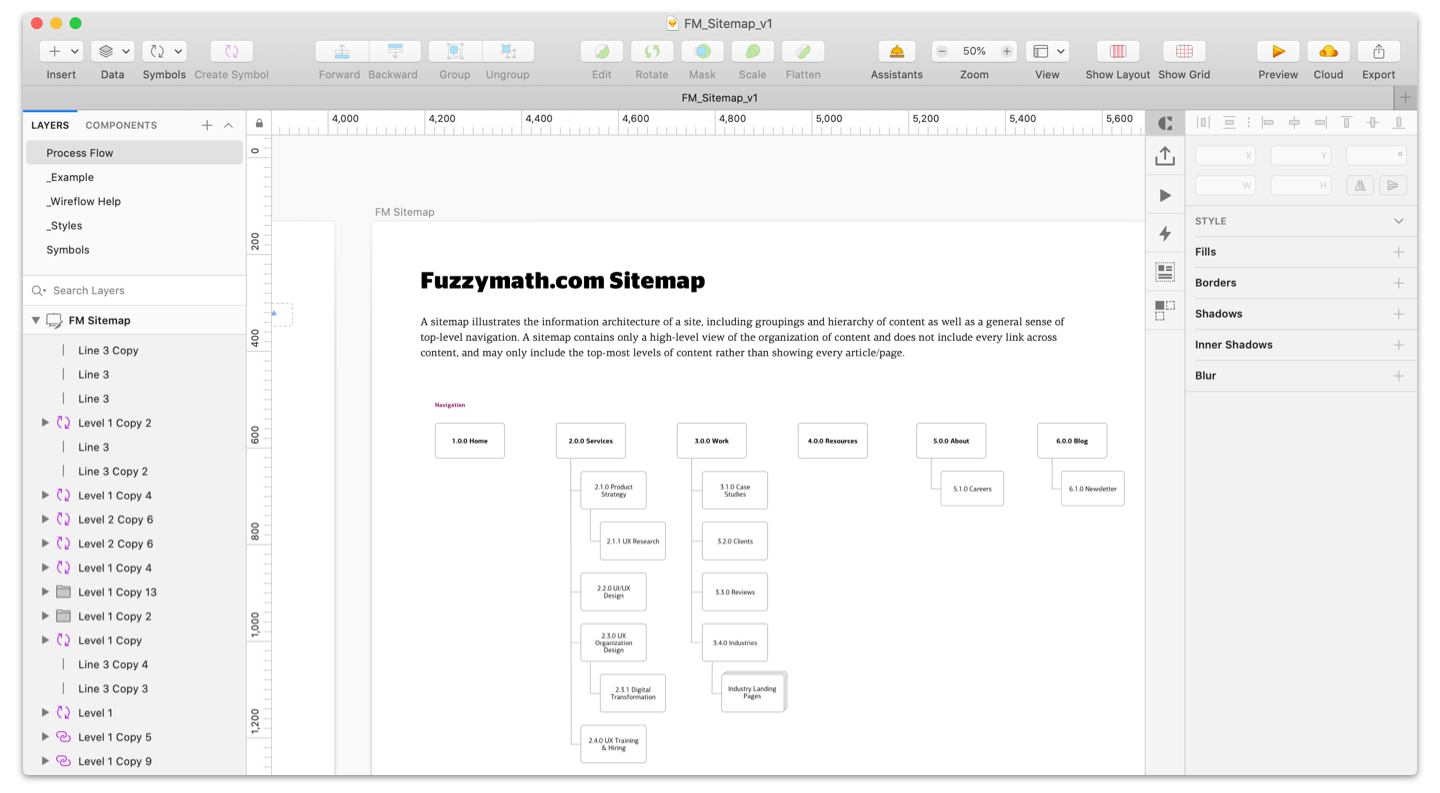
Sitemap
The sitemap defines the future state information architecture of a digital product and provides the blueprint by showing how the product is put together and where features/content exists across the entirety of the system. Information architecture is informed by discovery research, especially cart sorting, to ensure optimization toward real-world usage. In some cases, multiple sitemaps may be used together to show role-based changes to the information architecture or other variations.
How it’s developed:
At Fuzzy Math, the UX designer(s) will analyze the research they’ve compiled on the existing product, user needs, and, in particular, on how users approach the content of the product (e.g. card sort). Next, they will identify all the expected screens and draw a box for each before creating groups from this list of screens and then giving each group a name.
This can be done initially using Sketch or in-person via sticky notes, which can provide collaboration with other designers or even client stakeholders. In either case, the sitemap needs to be cleaned up and digitized in Sketch prior to delivery. In most cases, each screen should be given a unique ID to help tie together future deliverables and track status.
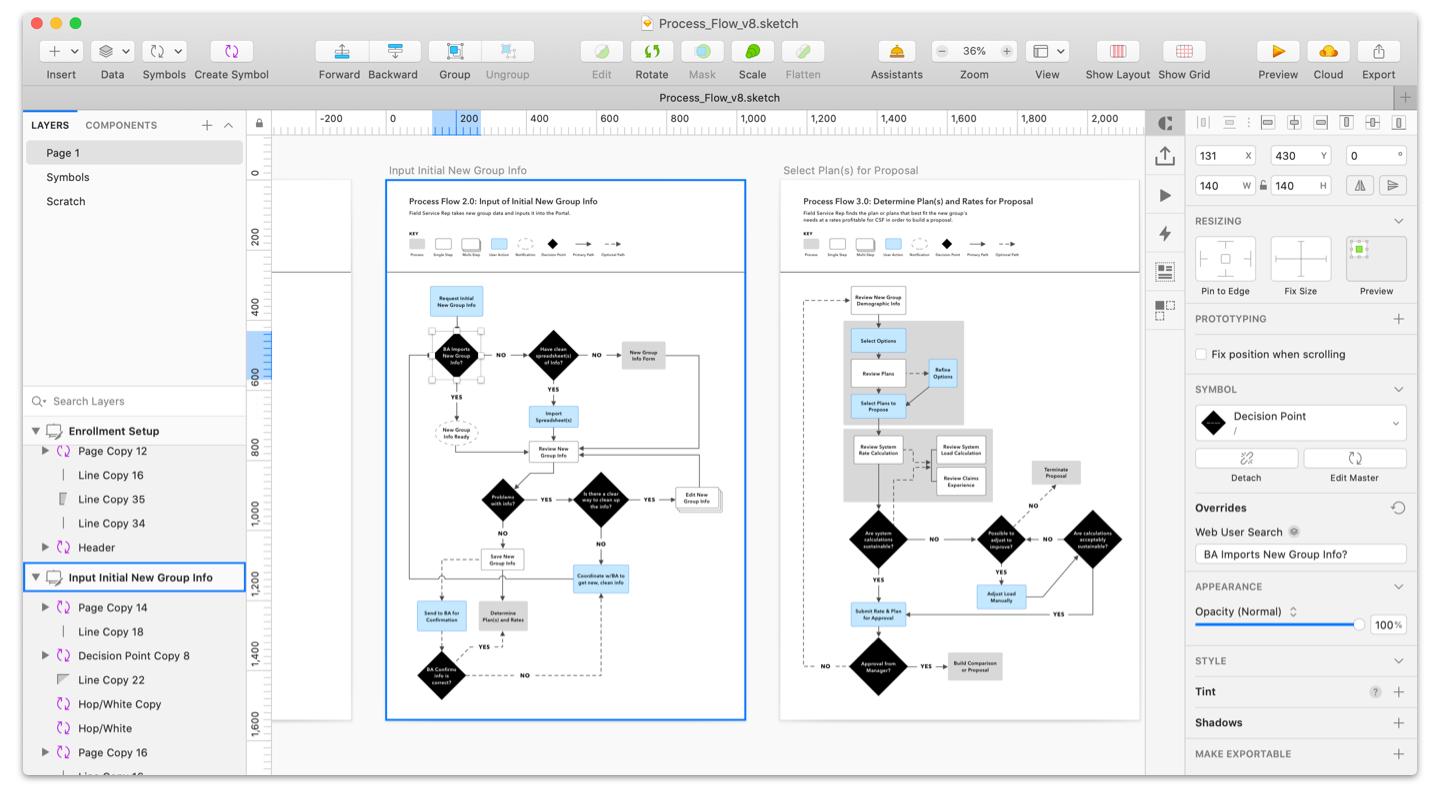
User Flow
User Flows describe the workflow a user(s) will follow to complete common tasks. They capture steps, decisions, and entry and exit points. User Flows are specific to the future state of the product, and part of the definition for the interaction design for an application.
How it’s developed:
In order to develop a user flow, a UX designer will start with a goal (just as they would with a journey map) and then plot out how the user(s) would go about achieving it by drawing out the flow in Sketch. Designers will document any place the user would need to take an action, where the system takes an action, and where the process may split based on user or system decision. They will also indicate any steps that occur outside of the product itself, or if there are any shifts in modality (e.g. steps that would occur on a phone vs. a laptop).
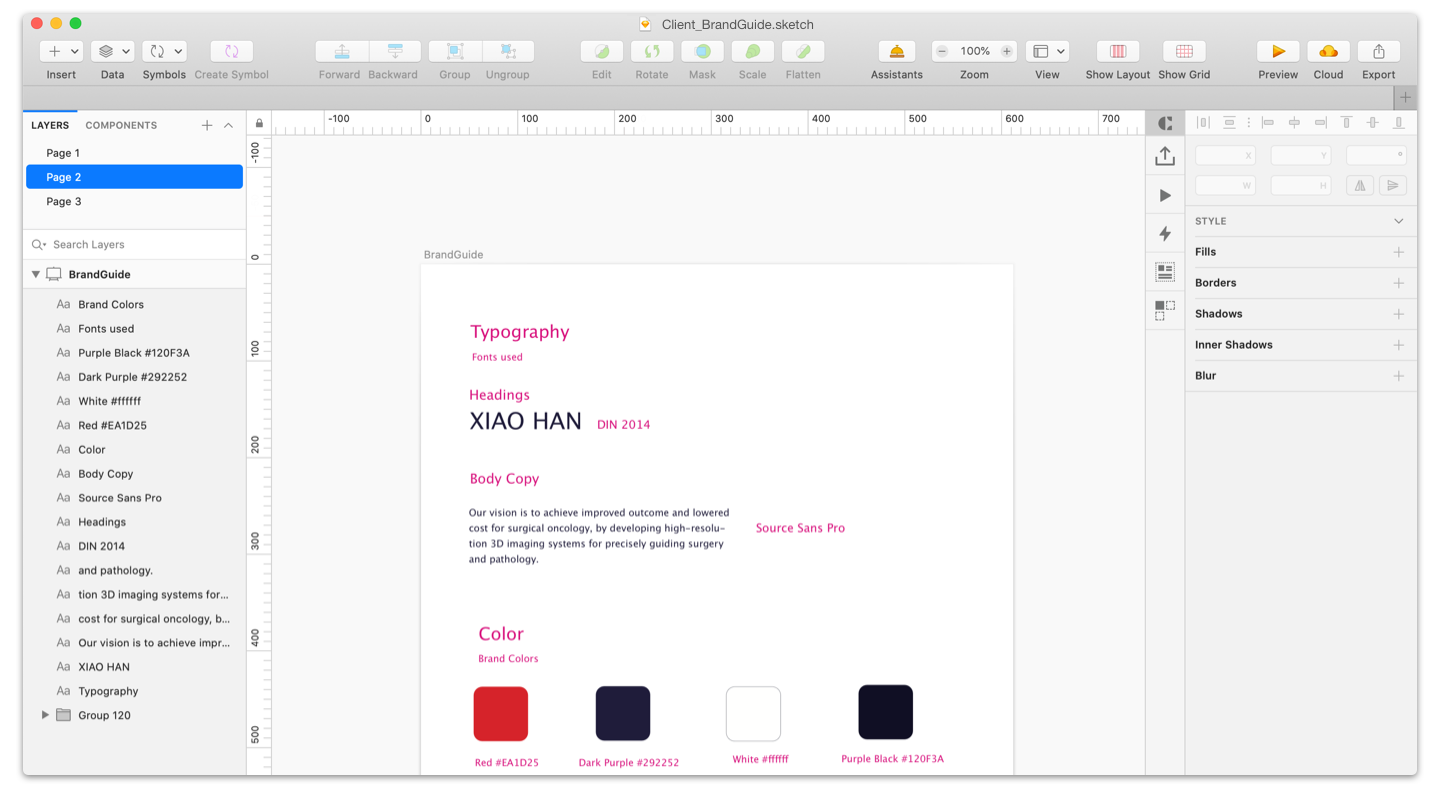
Brand Creation
Development of a new brand, or significant redevelopment of an existing brand, including logo and other marks, brand messaging, color, type, and imagery.
How it’s developed:
Before diving into brand creation, the visual designer has to ensure that they understand the client’s goals for the brand, including how it will be applied — a Brand Review and positioning workshop should already be completed, alongside Mood Boards to determine the directional approach.
To start, a designer will create lower-fidelity sketches of logos, aiming to quickly get feedback on concepts and narrow the direction. Once a logo direction has been agreed upon, the designer will use Sketch to create a refined, high fidelity version or versions, and get approval before finally creating the spec to detail usage. Next, they’ll combine logo specs with typography, iconography, color, and brand messaging to form the brand guide.
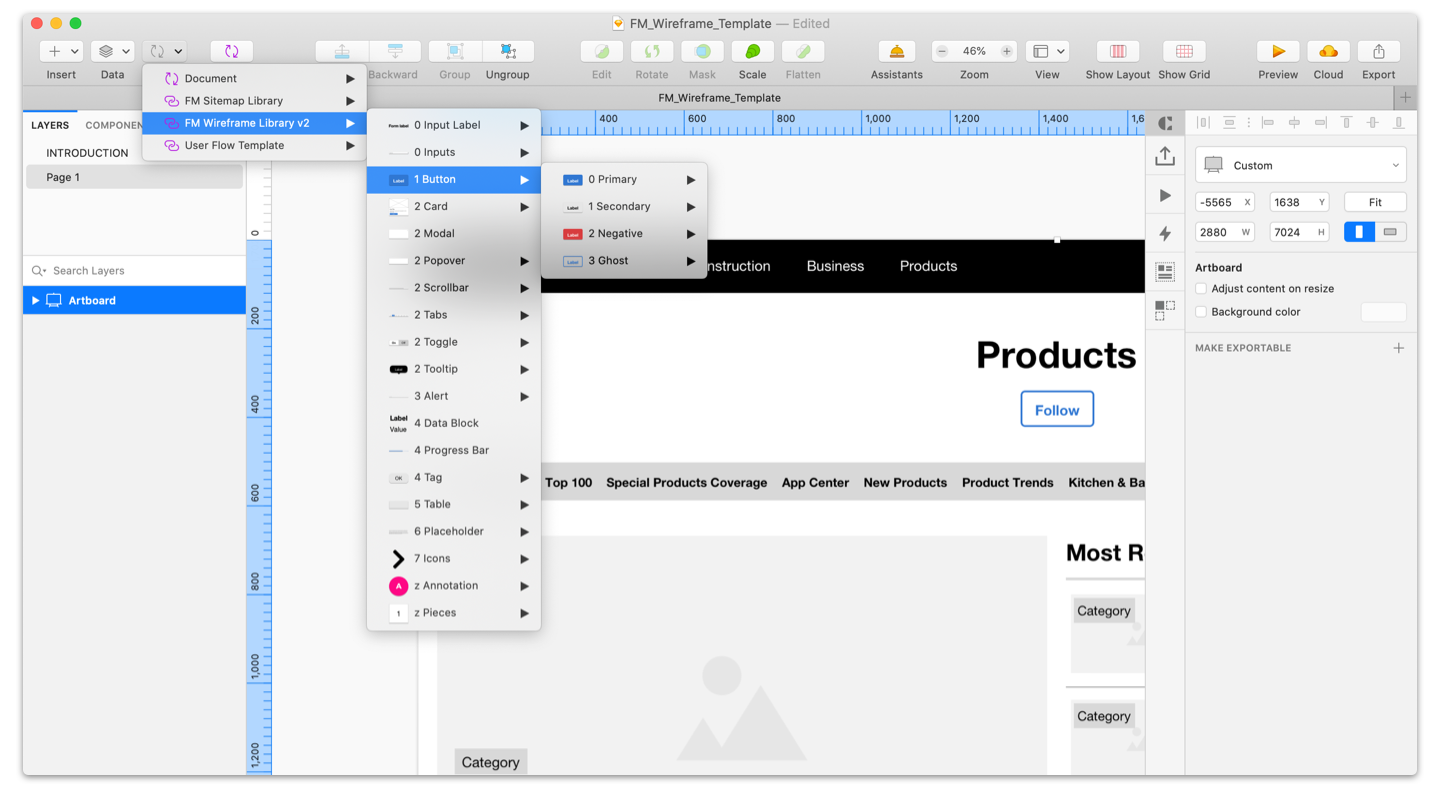
Wireframes
Wireframes are low to mid-fidelity screen designs that showcase a product’s layout and interaction. Taken as a whole, wireframes show the workflow across the entire system. Each wireframe corresponds to a single screen, and often a single state of that screen. One screen thus can have many wireframes defining different states of the screen (e.g. responsive displays, components in active/inactive states, empty/filled). Wireframes by definition do not show visual styling beyond what’s necessary to understand differences between components — typically this means that interactive components and status indicators may be visually set apart. Essentially, wireframes serve as the spec for the functionality and interaction of the system.
How it’s developed:
The UX designer, referencing all available data and background, should identify all the necessary components of the screen, including functionality and data. Then, they will craft a layout all within Sketch that builds these components into a cohesive screen, making sure the priority of items aligns to the goals for the screen, and that all functionality is accounted for.
As wireframes are built out, designers will ensure consistent UI patterns are employed across the system. If multiple UX designers are working in tandem, they will review one another’s work regularly, keeping an eye out for divergent approaches to the same or similar problems.
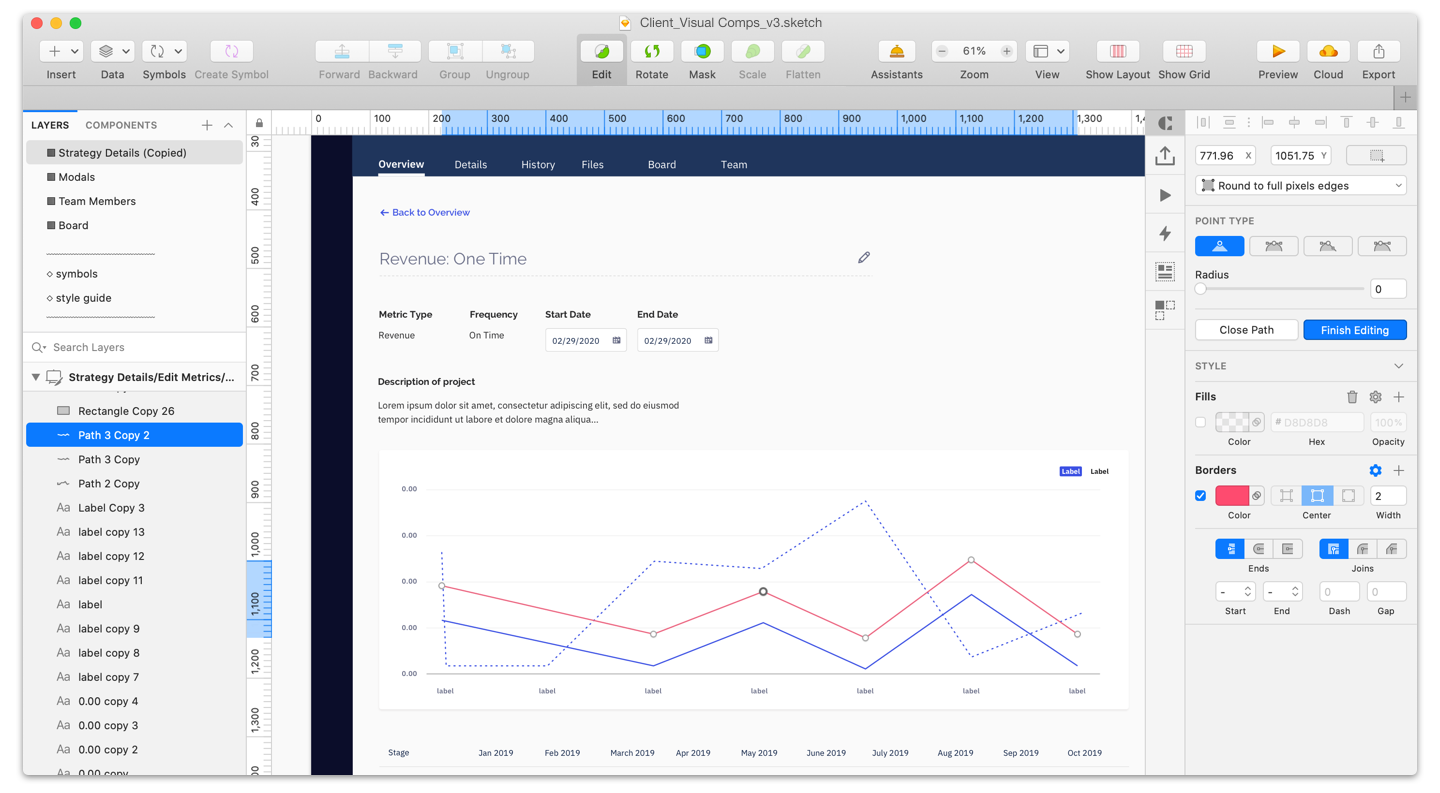
Visual Design Compositions (aka visual design comps)
Visual design compositions are high-fidelity screen designs that show the application of the visual direction on the content of the screens. Visual design compositions build on the content and workflow defined in wireframes to incorporate beautiful, accessible look and feel that extends the product branding into the product itself. This serves as the spec for the UI look and feel and a final input for screen development.
How it’s developed:
The visual designer should meet with the UX designer to discuss the screen(s), the intent behind the design, and any specific constraints. Before starting on a comp, the visual designer should understand the goal of the screen and it’s users, and where decisions that affect the visual design were made purposefully, versus where the design can change. They should also address any concerns with the UX designer and reach a mutually satisfactory resolution.
With a clear understanding of the screen in mind, visual designers should lay out the elements of the screen, apply the visual direction defined for the project (e.g. mood boards), and iterate and finesse the design until satisfactory.
Once complete, review the comp with the UX Designer, discuss any feedback, and ideate as needed. Review with client stakeholders and gain approval for the comp.
Prototype (w/ Invision)
Prototypes build on wireframes or visual design comps to make components usable, either through basic navigational control (e.g. screens are linked together through hotspots) or through more complex interactions.
How it’s developed:
For most projects at Fuzzy Math, the goal of our prototypes are to piece together screens so that they are cohesive and give clients the ability to click-through in order to see how the product will look and function once it’s fully developed. In order to do this, visual designers will gather their design comps created in Sketch and add those screens into InVision where they will then be able to link them together with hotspots. A link to the prototype is then sent to the client for review.
Delivery Phase:
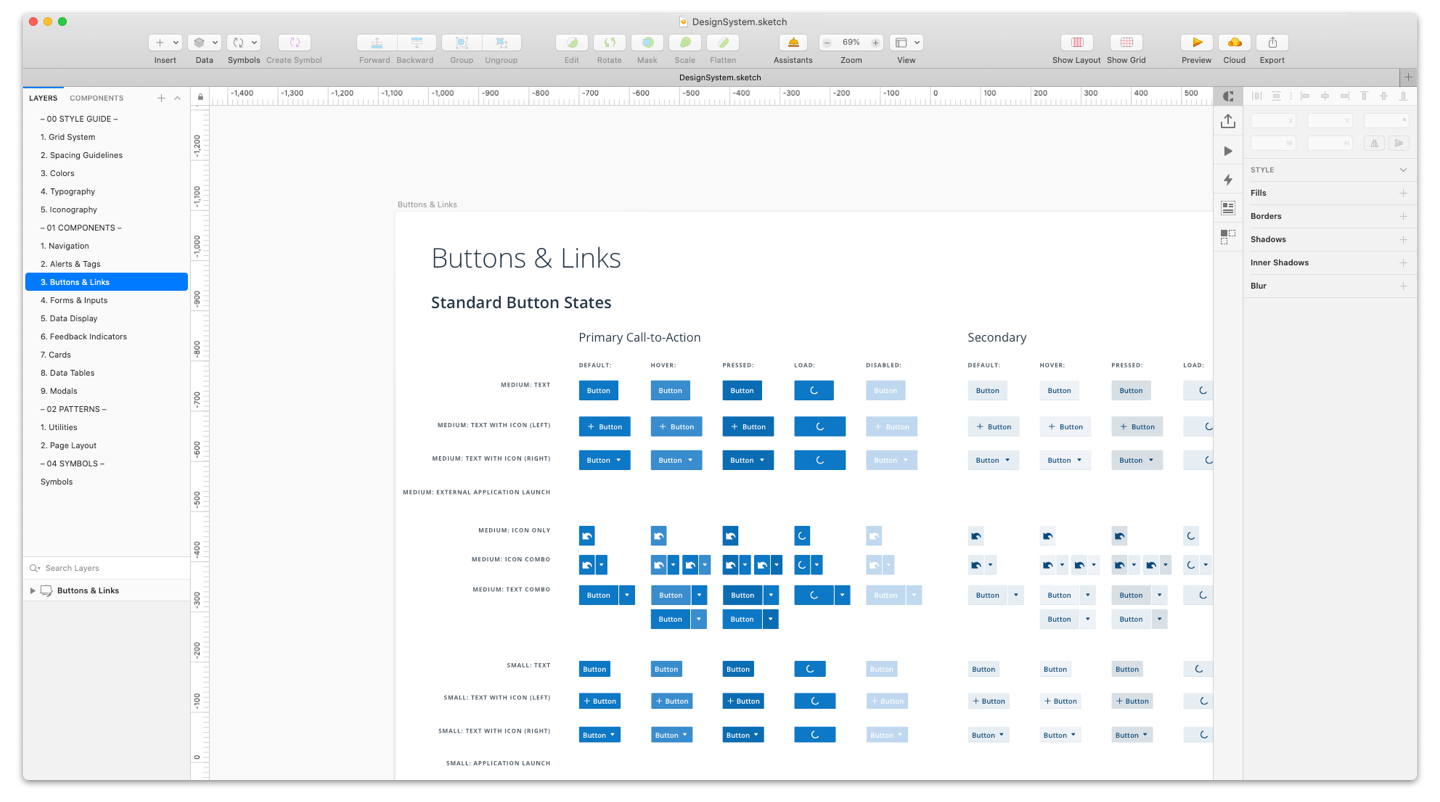
Design System & Style Guide
A design system provides a set of reusable components and guidance on how and when to use them. These components may exist just in design, or may be coded to provide the most streamlined usage. A design system also includes a style guide, which documents the visual design system employed on the product, including spacing/grids, type, color, iconography, imagery, etc. Plus, it provides the details needed for a new UI designer to easily gain clarity on the visual system.
How it’s developed:
Throughout the design process, the design system should be in mind and as components are defined, designers should be thinking about whether it’s a reusable component or if it’s specific to just a single purpose. Consistency in wireframes and visual design comps is the first step toward a design system.
Once the design is complete, designers should review the design and document all reusable components, including both granular components (such as form inputs) as well as more complex components (such as an item detail card, that may combine many smaller components). For each component, designers will document the visual design (the design spec), any intended functionality, and guidance on how and when to use or not use that component. If code exists, any relevant code snippets should also be included in the design system.
Design systems are typically documented first in a Google Sheet for easier collaboration. The final deliverable is then built in either Sketch or HTML, depending on client needs — Sketch is easier for client design teams to consume, while HTML is easier to use for audiences who will only be consuming and not maintaining the system.
Related: What is a UX Design System?
Sketch is one of the most popular and powerful tools out there for UX and UI design, and it is essential for every UX designer to understand the basics.
Accelerate your UX team by partnering with us to optimize your design practice with our UX training and hiring services.